|
Google has updated its Google Sites and has finally released it to schools. Why is this such big news? Google Sites is so much easier to use and it looks like a professional site. Google has integrated the formatting and auto save features of Google Classroom and other Google Applications. The new sites reminds me a lot of Weebly which is what I use for creating this site. To add a new feature you simply click on the menu on the right and then you are able to drag it to position it exactly where you want. You can add content from Google Drive, and search for images using Google Search Engine. Google Sites has a multitude of uses. Teachers can use it as a place to house resources and examples of student work. Yes Google Classroom allows you to collect student work, but Google Sites would allow you to share examples of what is going on in your class with parents, and the world. Create student portfolios. Students can create an electronic portfolio of their learning journey. This could be organized by class, or by year so that it grows with them as they move from grade to grade. My last district included a graduation requirement for seniors to present their electronic portfolio. Provide opportunities for students to collaborate and create group sites. Students could create Public Service sites to draw attention to an issue they are researching and provide a platform for making a difference. The video below provides an overview of how to use the new Google Sites. To get to the new sites go to sites.google.com/new. Below is a short tutorial about creating a Student Portfolio. Here is a sample site I created to show what a portfolio site could look like. There are other features that I didn't get to explore yet or didn't include.
0 Comments
The other day I was having a conversation where we were voting on our favorite creation tools. I personally voted for WeVideo because of the diversity, but Jon Spike pointed out the power of Google Slides, especially for creating storybooks.
I decided to explore Slides for creating storybooks. I created the following example below based on the story The Three Little Pigs. I chose a copyright free story as my example and copy and pasted the story in a Google Doc. Instructions for creating
You can create your own Slides Template, or use the one I created here. You can create an example for students, or provide them with the template and guide them in adding the text and images. I also updated the template here.
You can modify the template to be 1 picture and 1 text box, or whatever works best for you. I added animation of the animals to create a more dynamic element to the experience. You can do this by clicking Insert Animation and making the images appear and disappear to simulate movement. Another extension would be having the students do a screen cast where they read their story to work on their reading fluency and give a voice to the story. My daughter is reading Win Dixie for Battle of the Books for school and she is reading in a southern accent as she tries to replicate some of the audio example of the story she heard. Think about the possibilities for students to create and showcase their talents, interests and personalities. Potential applications
Bilingual - I have been working with a bilingual class and thought it might be a great opportunity for students to create a story in their native language and then do the same story in English to work on building their language fluency in both languages. The idea came from working with the teacher where she had the students create a green screen weather event video project first in their native language and then in English.
In the example above I put the English version on the left and then used Google Translate in Google Docs to create a Spanish example. I spoke with one of our Spanish translators and found the translation isn't a really good one because Google does a word for word order translation and that doesn't fit with how it would be written in Spanish. World Languages - Students could write a story in English and then translate it into the language they are studying to demonstrate their understanding of the language and how to properly write in the alternative language.
English - Students can create a story that they could illustrate, or find images to help tell their story. The stories could be shared with younger students. Since the stories are digital it makes it much easier to create a shared folder that can contain a library of student examples.
Social Studies - Students could create historical fictions, or alternative historical timelines based on one event or one decision. What if stories. What would have changed in history if... this event had not taken place, or if a different choice was made?
Science - Students could create lab journals using slides where they chronicle the steps in the experiment or lab. Students could create a journal in biology of the exploration of animals or organisms where they take pictures and label them to create a visual presentation that they can share with classmates.
All about me - Students could create an all about me presentation using slides and the story template. You could put topics on each page that students would share a picture and write a caption that helps others get to know them better.
Well Google Classroom is a great tool for both of these tasks. But beyond Classroom, there are some tools that can transform your classroom into a paperless at least a less paper environment. Google Classroom
Google Classroom is an amazing tool for organizing resources and collecting student work. I used to have a Google Site and use Google Forms to collect student tasks, but there were issues with students not changing the share settings properly which added additional time and effort to be able to access student work.
Google Classroom integrates into your Google Drive for both teacher and student and creates a folder in your Google Drive called Classroom where resources can be quickly located and accessed. The videos below share the process of setting up Google Classroom and the second video shows you what Classroom looks like from the student side. The first video is a guide to setting up Google Classroom. It is an overview video. The second video is much more detailed. If you are interested in setting up Google Classroom and would like some assistance in working through the process or ideas on how to utilize Classroom to its fullest potential, please let me know. I would be happy to sit down with you and share a book I have on 50 ways to use Google Classroom by Alice Keeler. If you want to see more of the student side, you can go to Classroom (sign up as a Teacher) and join my training class using code 2a7gig0 (if the last one isn't a zero try capital O). You will then be able to explore what students see. The main points of the student view are the ability to submit and unsubmit assignments and also be able to Add products to an assignment that may or may not be Google Apps for Education products like Google Docs, Google Drawing, Google Presenations, etc. They could add files from their desktops, or links to websites as well. Screenshots as a tool for learning
Screenshots are a great way to capture information quickly and share it with others. Our team uses screen shots frequently to create directions you can use to assist you with IC for instance. We have an example of how to use Screenshots on the following page- How to use Screenshots.
I was working with students the other day in the LMC of one of my buildings and noticed many were using a program called Geogebra. I have heard great things about this math program and saw students creating examples of their understanding and solutions to problems. One thing that stood out to me was that they were printing the final results of their graphing assignment. I started to think about how we could use Screencasts to avoid printing and still provide the teacher an opportunity to provide students with feedback. Screenshots added to Google Drawing can create a new product that the teacher can then use Google Drawing tools to annotate and comment to provide students with feedback. Screenshots and Google Drawing
I think the situation arises often when students are asked to diagram, label, or identify things on a visual platform.
In Science students are often asked to label diagrams. If teachers take a screen shot and insert it into Google Drawing, students could label the image to demonstrate their understanding. In Biology, students during a dissection lab could take a picture of the insect, plant or animal they are studying and insert it into Google Drawing to add more detail to their labeling and create a visual study guide to assist them throughout the unit or term. In Social Studies, students are often asked to map out regions or annotate maps. Using screenshots in conjunction with Google Drawing, students can create annotated maps. Another alternative would be using Google Maps to add information to a map where they could add pictures and videos. Teachers and students are often asked to create visual presentations. One common mistake that is made is not looking at copyright information before selecting an image. Checking for this information may seem like a daunting task, however the video below shows you how to make that easier. It begins with how to do this in Google which many students will go to by default and then 4 other options for finding free images. In each there are steps you or students need to take to verify that you are selecting images that are free to use. In addition to the video, GBAPS offers some applications that students can also access images like Discovery Education, Culturegrams, Britannica Image Quest, to name a few. Use the resources in the video at your discretion. One aspect of these options is there is not login for students or sharing of personal information if used as described in the video. Google Draw- Google Drawing is a great way to create visuals for a multitude of applications. It allows you to pull images into the program using the Research tool (under the tools tab) and dragging and dropping the image. You can layer images, add text and shapes. There are a multitude of tools available via Google Draw. I wanted to share 2 things that have come up for me this week. Cropping and Saving. Cropping Images Google allows you to crop images you insert. Cropping is a function that I am sure most people have heard of, and is included in many products, including many camera phones. What I recently came across is the ability to crop an image into a shape. You click on the image- then the crop icon appears with a drop down arrow next to it. Click the arrow and you will see shapes appear. Choose a shape and you will change your image. See Below-  Saving Google Draw images
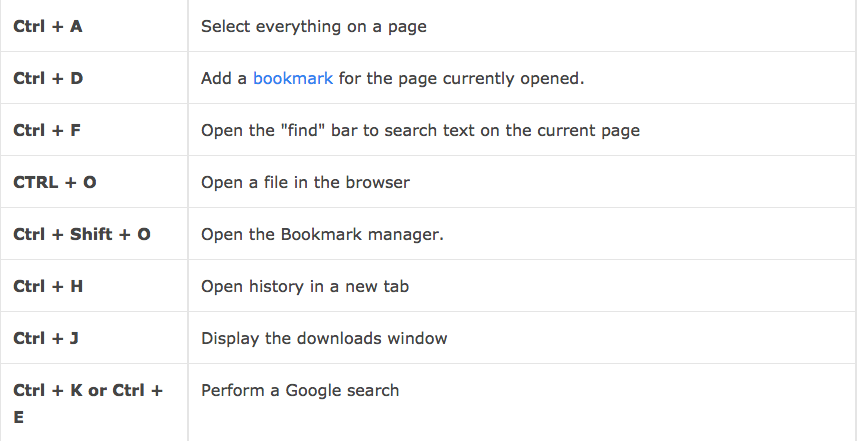
I was asked about sharing/emailing images to the print center. The image that we were looking at wasn't able to be saved as a PDF which is the preferred method for the print center. We inserted the image into Google Drawings and then clicked File Download As and chose a PDF. This allows the image to be emailed to the print center. One of the biggest complaints I have heard from teachers when switching from Word to Google Docs was the lack of columns. This feature allows for organization of information and I will admit I missed it. Google has just released this feature and now you can add columns to a Google Doc by clicking Format then choosing Columns.  Chromebooks have shortcut keys that allow you to do things more efficiently. I have shared examples of Google Docs and Google Chrome shortcuts. Here are some shortcuts for Chromebooks. The one that I was most excited to learn was the screenshot. I use it all the time on my non-chromebook computer. On a PC there is the snipping tool in the Start menu and a macbook you can use Command Shift 3 for full screen and Command Shift 4 for selecting part of the screen. The images below show some of the shortcut keys. To see the entire list click on shortcuts for Chromebooks. Did you know?
1. When you reply to an email you can change the subject.
There are occassions when we want to communicate with someone and it is just easier to reply to a previous email than to start a new one. This can sometimes lead to confusion if we reply to an older email thread about an unrelated topic, or use an email that was sent to the entire staff where the subject doesn't fit our message. To avoid this, you can simply change the subject of the email message when you in the process of replying to the original sender. See the video below for instructions on how to do this. 2. Organizing your inbox One of the problems with email is that it never ends. We continue to receive emails daily. The question is how to better organize all the information that is coming to us without finding ourselves burried in emails.
Have you ever misplaced an email? It happens to most of us. In this short video we look at how to search your Gmail to locate the email you need. Using the Blue Magnifying glass at the top you are able to search Gmail for emails. The video shows some of the filters you can use. I forgot to mention the search by size of the email or search by time frame. You can adjust the search if you know the email contained an attachment, or if you know the size of the file. You can also help narrow the search by putting in a time frame of when the email was sent or received. I hope the tips and tricks for Gmail will help you use Gmail more efficiently.
I was recently working with a staff member who has to switch rooms throughout the day. As we worked together on a project, I began to notice some areas that were pain points for him as he had to log in and get all of his applications and files up before he could engage in the lesson. From that I put together the video below about managing tabs in Google Chrome.
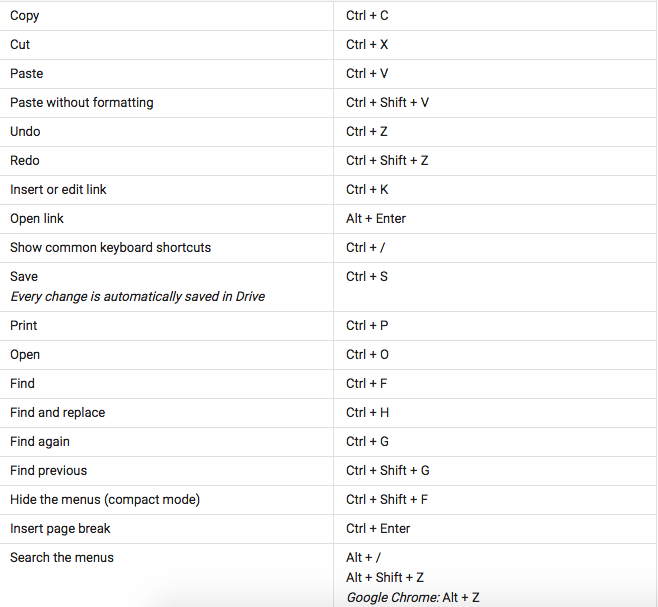
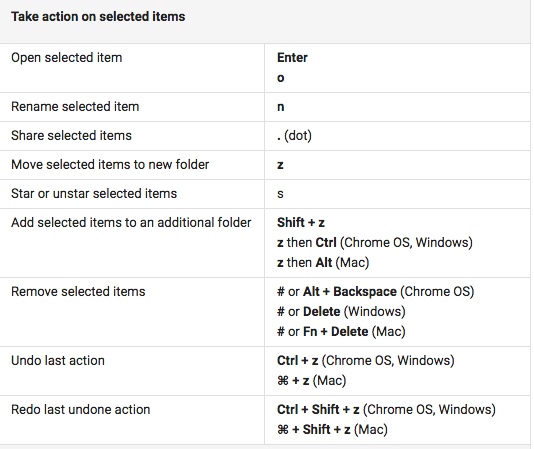
Below the next video is a set of keyboard shortcuts that can help you work more efficiently in Google Apps. One that I don't think is very common is Shift Z. This isn't one that is used frequently, but does have an important purpose.

Shift - Z (on a Mac see above if that doesn't work on your device) allows you to place a document, file, presentation, etc. in more than one place and have any changes made to one version apply to the other. It is sort of like when you share a document with another person in terms of functionality where changes occur simultaneously to both. Shift Z allows you place a document in more than one place and be able to continue the work in either place. This can be useful when you are working on lesson plans, shared resources with a team where you, or help in organizing resources in your own drive.
Caution:
When using Shift-Z if you delete the file in one place, you are deleting it everywhere it exists. There is a way to avoid this. If you right click on a document/file, you can click View Details. A window will open on the right and show you everywhere the file exists. You can click on the X next to the location where you want to delete the file. Any place that still has an X, the document will remain safe and sound.
|
AuthorBen Brazeau Archives
September 2018
Categories
All
Categories |
 RSS Feed
