|
Screen Casting is one of my go to uses for technology. I use it often to create instructions for others. I started using it in the classroom when I was demonstrating a new process or technology with my students. I later began creating screen cast videos for when I was absent. I found it beneficial to create instructions for my students that my guest teacher was able to play, or share with students. All students received the instructions directly from me, and the guest teacher was able to focus on engaging with students and support their learning.
Students and Screen Casting - In the past few years I have seen a multitude of uses that teachers have come up with for students using screen casting. Students used it to create a presentation. They would create their Google Slides presentation and then using a screen casting tool, would record themselves speaking about each slide. This way they created a presentation that could be shared with the teacher, students, and their parents. Students have used screen casting to record themselves reading their stories or storybooks. Students have been able to bring to life the stories that they have created as they use their own voice to emphasize specific words or phrases and the story comes to life. Students have used the tools along with Google Drawing to demonstrate their learning and thinking. Teachers have set up an activity in Google Drawing, and the student was able to move or manipulate the images or words in the Google Drawing while they discussed their thinking. Create Video instead of Screen Casting - If the learning activity that you want to capture isn't on the computer screen, you can use the webcam on student devices. There are a couple of programs that we could use with the webcam to capture student learning. Ideas for Video Recording - Students can record themselves reading a story, or a page of a story to check for reading fluency. Students could record themselves explaining a math problem they solved. Students could respond to a prompt on the board or in Google Classroom and record themselves. Students could practice a skill and record themselves periodically to demonstrate growth. Some teachers have had students record themselves speaking, reading, etc. throughout the year to provide evidence of growth. This has also been used in Choir and Music. Physical Education has used it for students to demonstrate mastery of skills. Screen Casting Tools - Looking at the approved list of tools, we see that there are two main tools that can accomplish Screen Casting and video recording. Those are Screencastify and WeVideo. A third tool that is a great resource to help students demonstrate their thinking is Voice Thread. This too is approved. If any of these ideas caught your attention and you would like to know more about how to use any of the tools to accomplish your learning objective, please contact me to set up a time to learn together.
0 Comments
The request for a good and easy timeline tool is one that I hear often. I have found a few sites that are able to create timelines. I have used Google Drawing as well. I however haven't found one that did a really good job and didn't require a login for students to use. I recently found a tool that is based in Google Sheets. The creator of the time line adds Year, Headline/title, Description, and Media to the sheet to create their own timeline. There are optional categories of information like Month, Day, and Color. In the end you or students simply enter the information and the program does the work. Here is an example of a timeline of one of my favorite people, Mr. Rogers. Click on the image below to see the full timeline. 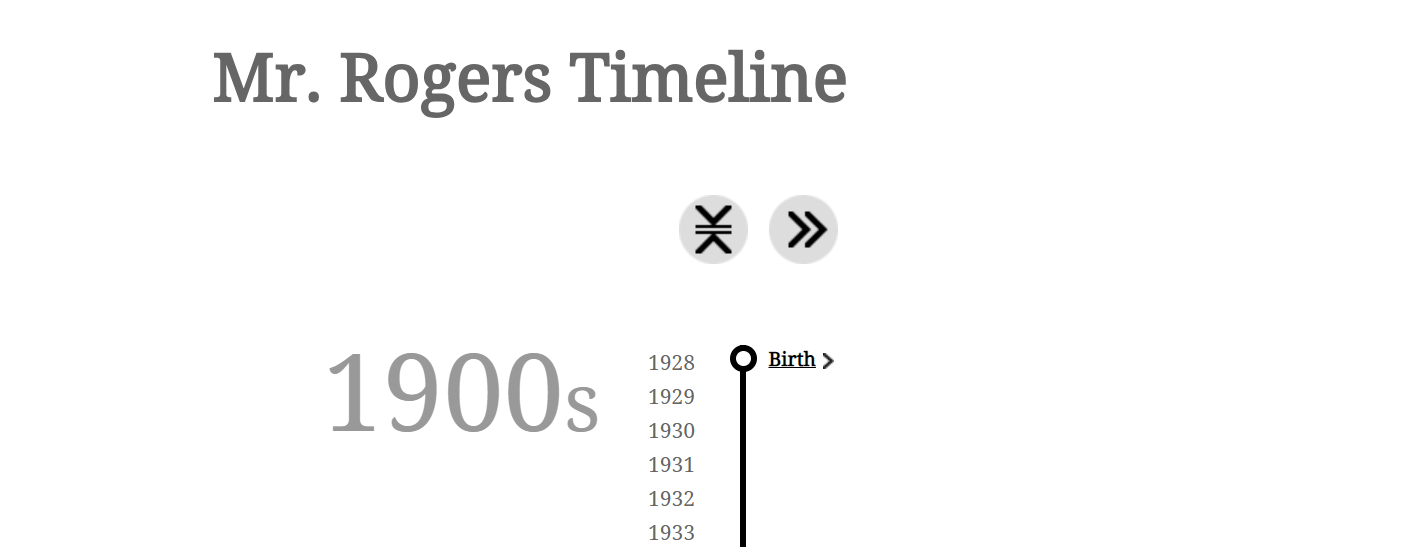 Click here to see the Template. It will ask you to make a copy of the document. As a social studies teacher, timelines are very practical to help students visualize events as they unfold to provide context. Students could use them to chronicle the life of a historical figure, a character in a story, scientific discoveries and more. Students could also work collaboratively to create a timeline of events like the Civil Rights Movement, Voting rights for women around the world, or any other topic that makes sense for you. The purpose of a timeline is to pinpoint significant experiences that impacted the person or event. Asking students to determine what experiences warrant inclusion can be a great learning opportunity as students have to justify their choices. Timelines can be created as a class where you chronicle the current events that occur throughout your year. You could use it to create a birthday list of your students including a picture of students and some information about their likes and create a star of the week document for the class. You could chronicle the events you discover in viewing current events or CNN10. You could chronicle the learning that took place in your year. Example, in September we started learning multiplication, in October we created our green screen videos about animals, etc. This could be a great way to demonstrate the learning that has occurred throughout the year. I am sure you have a number of ways you could use this tool and timelines in general. Please share your thoughts in the comments below. Note: You do have to remember to publish your sheet in order for this to work. You can publish the sheet by going to File, Publish to the web and complete the steps to publish the sheet. Then you click on the link tab of the sheet and copy the URL. You share your work by sharing this URL with students, or students share with you by submitting it in Google Classroom. 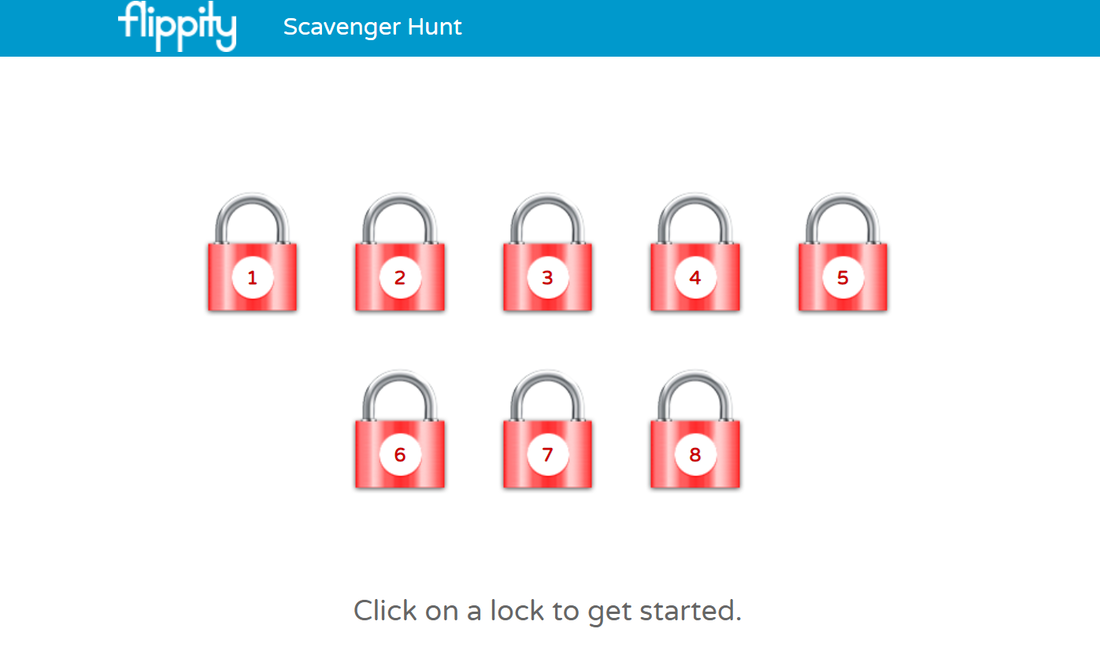 Scavenger Hunts are a lot of fun! One problem traditional scavenger hunts tend to present is the need for the teacher to check student work before giving them the next clue or task. I have created Google Form Scavenger Hunts which are awesome as they get students up and moving, and can be self checking so the teacher is able to move around and observe students participating in the activity.
This weekend I came across Flippity.Net's Scavenger hunt. I tried the demo and was hooked. You simply click any of the locks, and answer the question. Questions can include text, images, and or videos. You can provide participants with clues which again can include text, images, and or videos. Answers are limited to text responses. When you get a question correct, the lock turns green and you are able to try a new lock. When all locks are opened, you will see your completed time. To use this with students, you could have them take a screenshot of the successfully opened locks. Including the time in the submission is completely optional. How does it work? 1. You make a copy of the demo spreadsheet. 2. Change the questions, hints, and answers to meet your needs. 3. Publish the sheet - Go to File - Publish to the web 4. Go to the Get The Link tab and share this with students so they are able to participate. Uses: This could be a potential extension activity to differentiate for students who need additional practice. Use it as a formative assessment or exit ticket to check on student understanding. Create an interactive lesson where you create a few of these spreadsheets and connect them to QR codes and create stations. Use Equatio Math, or another program to create math equations to check student understanding at the beginning of a lesson. Create a team activity where they work through the questions as a group where they focus on collaboration or team building. As always I am sure you will find appropriate ways to integrate this tool into your curricular area. If you have any questions, or need help, please let me know. Here is an example I created. Here is the link to the template to create your own. Scavenger Hunt. We all know that formative assessment is a powerful instructional tool. I learned about Summative and Formative assessments years ago and understood the concepts, but struggled to see how to incorporate quality formative assessment that was also quick and easy to use. I have a feeling that I am not alone. We all want to know where are students are at, but sometimes don't know how to do this effectively. I have created a few resources about assessment that include technology tools, but many of those require students to have devices. I love using Recap as an assessment tool. Students can demonstrate their thinking, or perform a task on video to show they have mastered the skill. I have a post in the blog about this, and am happy to share more about how to implement Recap with your students. However this post is about the use of low-tech assessment tool known as Plickers. I learned about Plickers several years ago when I was in a BYOD or bring your own device classroom. Many students didn't have devices consistently, so it eliminated the ability to use many of the assessment tools on a consistent basis. Then I found Plickers. It uses QR codes on a piece of paper and the app on your iPad or smartphone. How Plickers works, you create questions on the Plickers.com website then present to students. You could just read the questions outloud if you didn't have a way to present the questions. Next using the app on your iPad, scan student answers. They present their answers by holding up their paper which contains the QR code. To get a better understanding of the process, check on the link below and the first video shares how a teacher uses Plickers in PE. Plickers Assessment And here is another post that I have shared with teachers about assessment. This one provides more ideas of how to use Plickers as an assessment tool providing ideas for when to use the tool. Plickers In PE. I hope these examples provide you some inspiration on how to incorporate formative assessment, not only in PE, but other areas that are quick and easy to access. Plickers is on the Yellow List for District Approved Resources - It can be used, however you should anonymize student data, meaning create made up names for students when using the application. 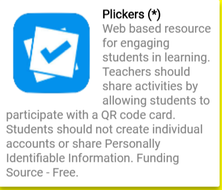 I am a huge fan of Google Classroom and all the functionality it provides. Classroom is a great tool for sharing information with students and provides amazing efficiency with classroom workflow. Google Classroom was unveiled just about 3 years ago and has improved every year since unveiling new features to make it even more powerful.
There are many resources out there about how to leverage the power of Google Classroom. Alice Keeler has written two books on ways to use Google Classroom and has a blog where she shares ideas about how to use Google Tools. Another great resource for Google Classroom is Matt Miller. He has a few posts about Google Classroom that I wanted to share. The first is an article providing some tips on how to use Google Classroom features to help you be more efficient. This includes ideas about providing feedback to students, reusing posts, and using classroom to email students among others. The second post is about using notifications to be more productive and taking control of how you interact with Google Classroom. I really like the ideas shared here about personalizing notifications to suit your needs, especially being able to turn them off when you "clock out." The use of notifications can help you keep up to date with student work to help provide students feedback, but be able to manage your life outside of school. I hope you will find some useful tips in these resources and that you will check out these blogs for more ideas that can assist you in integrating technology. Matt Miller is an amazing educator who I have had the pleasure to meet several times. He is passionate about students and meaningful technology integration. Matt has written countless blog posts about technology integration and the book Ditch That Textbook. I have read the book and found a number of great ideas. I share this background as I plan to share some of Matt's ideas with you throughout the year, but also wanted you to be able to peruse his resources for yourself. DISCLAIMER: Some of the tools Matt suggests in his posts do not match our approved Online Resources. While this is true, Matt's ideas about how to use technology are excellent and we do have a lot of approved resources that can make his ideas reality. Integration IdeasBell Ringer Activities The following is taken from Matt Miller's 10 digital bell-ringer activities to kick start class posts. I have modified Matt's two posts about bell ringers below to include activities that use approved tools. Please take a look at his original for more details and ideas that you could use with your students that could be modified to use approved tools. BELL RINGER ACTIVITIES 1. Add speech bubbles to a historic photo. Add a new twist to a lesson by letting students speak — or think — for the characters. My favorite way to do this is with Google Drawings (for creating individual images) or Google Slides (for having each student create a slide in a shared presentation). Do an image search for a historic photo and add that photo to the drawing or slide. Then add speech bubbles. (If using Drawings/Slides, it’s in the shapes under the “callouts” category.) This is higher-order thinking! Students must know their facts and understand the people involved very well to be able to think for them. Kick the Depth of Knowledge level up even higher by having students justify their thinking and explain why they wrote what they did. Example: Washington crossing the Delaware. Find the historic painting and add a thought bubble for Washington. (Then, add a thought bubble for a soldier too!) 2. Ask a character/historic figure a question. What if students could ask someone they’re studying a question? What would they ask, and how would that person likely respond? This is another that can be done quickly and easily in Google Slides or Drawings. Let students take a photo of themselves using Insert > Image > Take a snapshot. Then, use the image search to find a photo of the person to whom they’ll ask the question. Add speech bubbles to ask questions. Students could ask one question with one answer from the character/historic figure, or they could do a back-and-forth with several photos. Example: Asking Sir Isaac Newton a question about how he concluded that gravity was due to the pull from the earth. 3. Create a flowchart. Sticking with the Google Slides/Drawings idea, have students express their understanding of a concept with a flowchart. This can easily be done with shapes and arrows (found under the line tool) in Slides and Drawings. A single line throughout a flowchart makes for more of a timeline and less of a flowchart, so any time it can branch off, the flowchart is made more interesting! (Pro tip: copy (Ctrl+C) and paste (Ctrl+V) the shapes and arrows to save time.) Example: Go through the process of deciding what to have for lunch and all of the decisions made in that process. 4. Make comic strips out of webcam photos. Those webcams don’t have to be just for selfie-style photos (especially those with peace fingers and duck lips …). Have students back away from the camera and pose to recreate scenes of what you’re studying. Or, have them sit side by side and have a discussion. This makes the students the stars of their own comic strips! Example: Recreating a scene from a story or having a discussion about something they’re learning in class. 5. Create a quick animation.Google Slides (or PowerPoint or any presentation slide tool) can be turned into a simple stop-motion animation tool. Create the first slide in your animation, then duplicate it, then move something slightly in the second slide. Duplicate the second slide and move something slightly in the third. Continue duplicating and moving until your animation is complete. Once your students have the hang of this, they can make animations pretty quickly. Example: Recreating historic battles with moving maps (here’s a brief, incomplete example of the Battle of Little Big Horn) or showing how a math problem is completed. 6. Shared slide presentations.Google Slides doesn’t have to be used just to do presentations in front of the class! Create a slide presentation with enough slides for each student in the class. Then share that slide presentation with the class using the blue “Share” button. (Be sure to use the “Get shareable link” button and choose “Anyone with the link can edit” or “Anyone from <your school district> can edit” from the dropdown menu.) Each student gets a slide where he/she can do his/her own work. But you’re also creating a whole class file. Students love to see what each other has put on the other slides, and it’s a great place to interact through comments. Here’s a shared slide presentation I did in a workshop where participants wrote about their ideal vacation destination. Example: Finding quick facts/photos online about a topic you’ll discuss in class that day. More Bell Ringer Ideas
7. Tweet for someone. What would happen if a character in a story you’re reading tweeted about an event in the story? Or about an event in current events … or in another story? What if a scientist or mathematician or notable character in history tweeted? Now, you can let students create those tweets as bell-ringer activities. Use this Google Slides template. (Make sure you make your own copy.) Create a slide for each student. Then share the slide presentation with your students (through Google Classroom, through a learning management system, with a link using the blue Share button). Make it “Anyone with the link can edit”. Students jump on their own slides and add the following: a photo, the name of the person tweeting, the Twitter username (start it with @), and the tweet. Ninja tip: To turn the photo to a circle, click on the photo and use the dropdown button next to the crop tool to select a circle as the crop shape! 8. Create a “What do you know about …” Padlet. Padlet (padlet.com) is like a digital bulletin board. Use it to tack digital notes to it with push pins. Those notes, though, can have links, files, images and other multimedia attached to them — much cooler than a regular bulletin board. Kick off class for the day by creating a collaborative “What do you know about …” Padlet. Pose a question: “What do you know about dolphins?” and encourage students to add whatever they can — personal experiences, facts, images, videos, whatever. This is a great way to activate prior knowledge. 9. Record a short explainer video. Sometimes, it’s just easier to show someone what you’re talking about than to write it. Students can fire up a screen recording video with WeVideo. Teachers can use WeVideo or Screencastify (screencastify.com) in moments using the tool’s extension for the Google Chrome browser. Students can quickly record their screen, record with their webcam and/or record audio with their microphone to kick off class. It’s easy for them to share those videos with others after uploading them to Google Drive — or to turn them in with Google Classroom. 10. Write blackout poetry. Have you ever seen those poems written by marking out all of the words in a news article or book page except a few with a black marker? This is blackout poetry. This can be a fun — and creativity-provoking — way to kick off class. Have students take a photo of a page of text (or a screenshot of an article online). Paste that image into Google Drawings or Slides. In Google Drawings, they can use lines or shapes (long skinny rectangles work great) to black out words. (Do a web search for “blackout poetry” for examples.) Students could create them on their own individual slides of a shared Google Slides presentation (see No. 7 in the previous bell-ringer post). If each student has his/her own slide, the whole slide show becomes a big gallery of blackout poetry! The author of the Article Lights, Camera...Engagement! Three Great Tools for Classroom Video, Ron Peck is a social studies teacher who I have been fortunate to get to know over the past few years. Animoto - I looked into Animoto and found that you are able to sign up for an educator account that needs to be approved by Animoto. This can take several weeks. After you are approved you are able to enroll students using anonymized names. The other two resources can be done with a multitude of tools. In each case these projects could be done with the camera on the iPad or the webcam on a laptop using WeVideo. An additional idea for video projects is Paper flip Videos. Paperflip Video is a simple project that uses your iPad or WeVideo and your webcam to create a product where students can demonstrate their understanding. A colleague Justin Birckbichler shared an activity he did with his students. It is similar to a project I have done with Google Forms on creating a Choose Your Own Adventure story writing. I have shared this idea in the Google Tools section of the blog, but I wanted to share his version because he makes some great points and shares how this activity worked with his students who were younger than the ones that I worked with. It always amazes me what students are able to do when we provide the opportunity and step out of their way. Check out his ideas here - Choose Their Own Adventure. 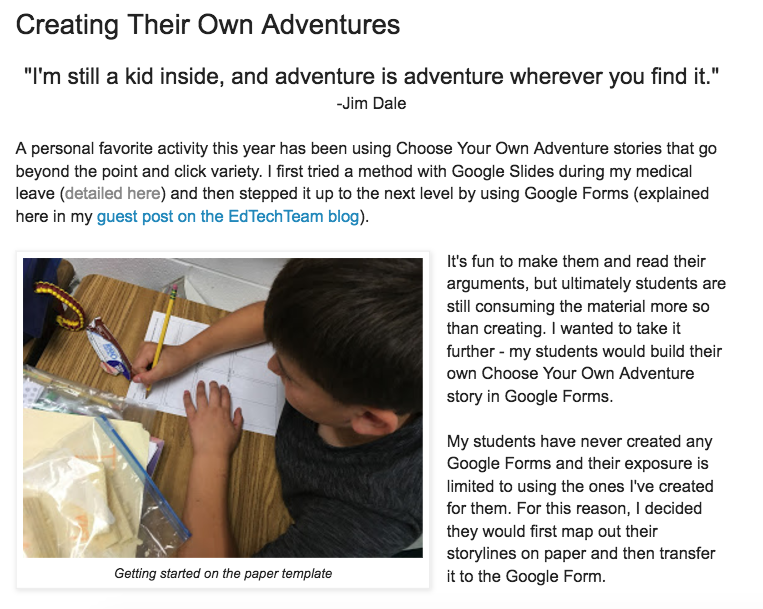 A.J. Juliani shared his post 5 Projects You Can Do in the First Month of School in which he outlines a number of ideas for things that students can do to show what they know. What I really like about the post is that he suggested providing students choice in how they would present their learning. He also provides choice in what topics students would explore with many of the choices he provides being real world topics that students are likely to have some connection to. These projects aren't necessarily technology projects, however there is the potential for technology connection with many of these. Another part that I really appreciate is to share student learning with the world. While we should always be cognizant of protecting student privacy, we can share out samples of student work that doesn't identify the individual students. If you have questions about appropriate sharing, please let me know and we can discuss this further.  Looking to change up the way students present their writing? Want something other than a simple Google Doc for students to collaborate on a project? I have shared some examples of Google Slide presentations previously that included Magazines, Facebook, and other templates students could use to create products of their learning.
Now I have a post about creating Newspapers using Google Docs that has sample templates you and your students can use to create your own Newspapers. There are several examples including some for elementary students. The templates have created the look of newspapers and are ready for students to edit the text and and their stories. While paper newspapers are losing their appeal to some in this digital era, they still have relevancy as sources of information and can be incorporated into student learning. One potential resource for helping students see the value of newspapers is Google's Newspaper Archive. Google started a project to digitize thousands of newspapers to create an online data base of journalism dating back to the 1800s. Unfortunately they have abandoned the project, however what papers they scanned are available online and searchable. Why would I want my students to look at old newspapers? These are just a few potential ideas that I brainstormed. As always I am sure you can come up with better uses for these resources than I could.
Using the Newspaper Templates
|
AuthorWrite something about yourself. No need to be fancy, just an overview. Archives
November 2018
Categories |
 RSS Feed
