|
Most of us have likely used Google Docs to create a document, share information, collaborate, and simply get things done. But did you know that you can insert an image into a Google Doc using your camera? I had a teacher share with me the following article as he was looking to integrate this into his classroom.
Alice Keeler Shared Adding Images Article -- In the article she outlines the process of adding images to a Google Doc by using the Chromebook Camera all while being in the Google Doc. She is the author of two books about using Google Classroom. The article is in response to a feature that Google Classroom added where students can add pictures or video responses to assignments in Google Classroom. The problem is, this function is currently only available in the app and not on Chromebooks. So to allow for a similar experience, you can add a Google Doc to Classroom to make a copy for each student, and then have them take a picture of their work using the Insert Picture tool in Google Docs. With the flipping ability of our cameras, students could have images, math problems on their desk and take pictures of it. They could go on a scavenger hunt to find images that represent concepts or ideas, they are studying. The idea of walking around with a chromebook should be introduced with expectations for behavior before you allow your students to embark on this learning journey. Think about how you could use the chromebook camera to create new lessons or activities for students. Share your ideas in the comments section.
0 Comments
Googlink as it is being called is a way to use Google Drawing to create Thinglink like interactive images. The idea is to add links to an image. These links take the viewer to additional information that will help them better understand the concepts of the poster or image that has been created. This could be a great way to present information in a gallery walk where students could scan a QR code the leads them to the image. Then they could view the resources attached. I could see this done in art where students take a picture of their creation, and then add links to information that would help the viewer better understand their work. This could include how it was created, the inspiration for the creation, and a general reflection on the process and learning that took place while creating their piece of artwork. Here are a couple examples of what this looks like. Click on the images below to open the Googlink.  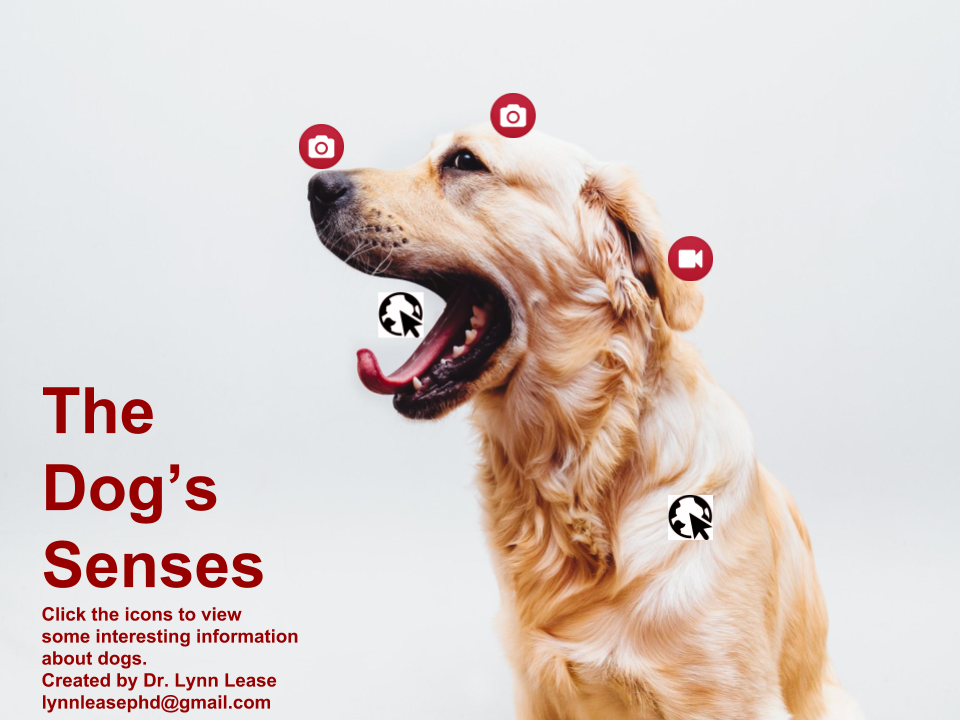 Here is the link that explains more of the process as shared by Eric Curts. I think this can be an amazing tool for students to demonstrate their learning in a new way. Please let me know if you have additional questions, or ideas for how to integrate this into your classroom. NOTE: When sharing the Googlink/Google Drawing, I first had to change the share settings to anyone with the link could view. I also when to the url that ends in edit and changed edit to preview. This allows people to interact with the links just by clicking on the icons you have created. Google has just released a new feature in Google Sheets. This may not be earth shattering for all people, but if you use spreadsheets a lot, and are working on verifying information, this will be incredibly helpful.
The idea of a checkbox for me is a tremendous addition. I use checkboxes when I create lists all the time. I use them in Google Keep when I take notes, create a task list and when I create my grocery list. Adding checkboxes to Sheets allows for a quick and easy way to identify completed tasks or verified information. One of the things I along with LMS do each year is device inventory. The addition of the checkboxes will allow us to mark off whether or not we have met with the person and if the information is accurate. This will help us with our maintain the accuracy of information in our inventory system. Here is a link sharing more information about setting up checkboxes. Want to help students organize their ideas and thinking and get more use out of the technology available to students? Looking for new ways for students to express their knowledge and understanding? I have shared other posts about templates like the Facebook Slides presentation, the Time Magazine Cover, or one of my favorites, the Virtual Museum. Today I discovered another resource for templates that you or your students can use to demonstrate their learning. This page has templates that are organized by grade level that could be used in a multitude of subject areas. One thing to note, is the author is Canadian, so some of the topics, especially historical references are not ones that would be common to American students. Beyond that, the multitude of choices and quality of many of these makes this a really great resource to help students present their learning in new and creative ways. I really like the magazine covers that were created like National Geographic and Rolling Stones are well done. Also think about how you could use a template like the Boarding Pass to create a learning adventure for your students. Check out more examples from Darren Maltais at his site Engaging Students Google Resources. One more resource for templates comes from Matt Miller who wrote Ditch That Text Book and more recently Ditch That Homework. He has a lot of great resources on his site. ditchthattextbook.com. He has created a number of Google Drawing Templates that could be used to help students organize their ideas, or help them plan for an activity. Check out his Google Drawing examples here. Is your Google Drive becoming a wasteland for documents and files. You have created so many Google Docs, Presentations, Forms, and Sheets, but now can't find them? Well the previous post on Searching your Drive can help locate them. But how can we do a better job of organizing our stuff? 1. Create Folders - putting things in folders helps declutter and organize. You can easily create folders and sub-folders. 2. Color Code your folders - If you right click on a folder you can click the color pallet and chose a color that will help you more easily identify what is in the folder. 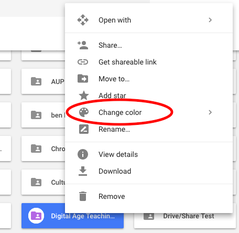 3. Add Icons To Your Folder. This is something I just learned about this week. You can copy and image and then rename your folder to include that image. Click the link above to learn more about how to add icons. This may not be something you do for every folder, but it may help you with organizing some of your work. 4. SHIFT-Z Put a document in more than one place. Shift-Z allows you to have the same document exist in more than one place. It is important to note that if you delete the document in one place you are deleting it from your Drive. The positive of this is you can put important documents like rubrics, lesson plans, etc. in more than one place so you are able to access them more easily.
The other day I came across a post on Twitter about how to search Google Drive. At first I thought, well I know how to search Drive, I can find the files I want when I want, but I opened it anyway. I am glad I did, because Alice Keeler included a number of tips and tricks that I didn't know. Please check out the presentation below, or click the link.
She also included a Challenge document where you can practice your newly acquired skills. When you have completed the assigned challenge, you can mark the first column with an x and you will receive a badge for your efforts. Think about the possibilities for this spreadsheet in your classroom. Do you have lessons or activities where students could have a similar spreadsheet in their Google Classroom where they earn badges for completing tasks in your classroom? If you have some ideas about how you might want to use this with students, please let me know and we can adjust the spreadsheet to meet your needs. 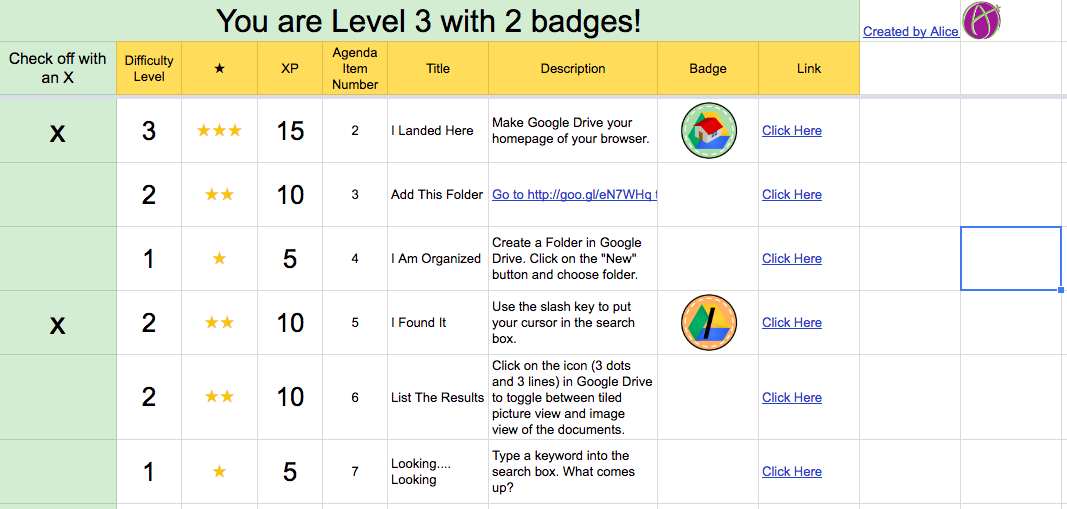
Google has just released an update to Google Classroom where teachers can now assign tasks to individual students or groups of students. I just saw the update on Twitter and within minutes was in a conversation with a colleague Justin Birckbichler and we were exploring the update. Google created a gif or animated picture showing the process where you create an assignment as usual, but then are able to assign it to the whole class or click on individual students. We wanted to know if you could assign tasks to small groups. The video at the bottom shows what we discovered. The ability to differentiate for individual students, or groups of students has come. You could modify an assignment for individual students, create resources for groups of students either based on topic or reading levels, create documents, presentations that the group can work on and edit collboratively, and so much more. Many elementary teachers already create reading groups, but sometimes find that students may migrate between groups as the year goes on. This feature would allow you to make those adjustments more fluidly. Individual assignments while applicable to reading groups might also be suited for small group projects where each group is studying a different topic and you are providing them with topic specific resources or leveled texts. Another use for this could be for truly individualized instruction. We all know we have students who are absent at times, or others who struggle with concepts, and some students who need some extra or different opportunities to go beyond where their classmates are currently. With individualized assignments, you could provide extra resources, tutorial videos, guided practice or extension activities to meet the needs of students in a way that doesn't draw attention from all the other students. The individualized assignment isn't seen by the other students in the class. The Directions and video are from Justin Birckbichler, the colleague I was collaborating with on the new feature release. He created the video as he was able to show the student view that I am currently unable. If you have any questions, please let me know. Written Directions:
Have you been working on a project and had to flip back and forth between two tabs or windows on your computer? Have your students worked on a video project where they record themselves but wanted to have their script accessible? Have you found yourself with so many tabs open you aren't sure what you have on most of them anymore? Google Chrome allows you to separate the tabs that you have open to create an additional window or session. You can pull the tab you want to work on down away from the rest of the tabs in Chrome and then put it side by side with the other session you are working in. There are also Google Extensions that allow you to separate tabs and then put them back together when you are done with your work. The video below is a brief guide on how to separate tabs to be able to work on two documents side by side.
I previously shared a post about Google Slides templates using slidescarnival.com and then came across the work of Ryan O'Donnell who I have followed on Twitter for awhile. He is in a similar role in another district and created some really cool templates. Students can create their own facebook page for a character in a story, or historical figure. They could report on an event, historical or ficticious using the Time Magazine, or National Geographic Templates. Those are just a few of the templates and resources Ryan has created and shared via his website.
There are numerous ways to use these with content, and I hope you take a few minutes to explore the tools and ponder the possibilities. Google Slides Templates Here is an example below.
Are you tired of the same old look in Google Slides? The new slides has added a few themes, but it is still pretty limited. There are places to get better presentation templates like slidescarnival.com or Google Templates which is where I found this photo album template.
You also have another option and that is to create your own template. You can do this by creating a new template and then editing the Master Slide and the other slide layouts to create slide templates for your presentation. Process: After creating a new Google Slide Click on Help in the tool bar Click edit master This will open up a new window where you can select the layout of the Master slide which is the default layout for a new slide. You can also edit the layout of the other slides to create the look you are trying to achieve. In the example below I added images as background to create place holders for text and images so students wouldn't have to do as much work in creating a nice looking slide they would simply add images and copy and paste their text. |
AuthorBen Brazeau Archives
September 2018
Categories
All
Categories |
 RSS Feed
